
Using the GoPro Hero 3 for 3D Photogrammetry Modeling and Measuring
Introduction
 The GoPro Hero 3 is a small, lightweight, robust, low cost, and high definition video and still camera used primarily for capturing action. The GoPro Hero 3 Black is one of the recent high resolution versions of the GoPro lineup that can be used for photogrammetry – the science of measurement, modeling and scanning using photographs.
Due to the GoPro’s small size, low weight, wifi, and good image quality it is an interesting platform to consider for photogrammetry. On the other hand, a DSLR camera with a choice of lenses is the best choice for high accuracy photogrammetric work.
 This article focuses on the use of the GoPro Hero 3 Black for photogrammetry with the PhotoModeler software, and how to overcome some of the camera’s deficiences. There are other models of the GoPro Hero but we focus on the Hero 3 Black only as it is the first GoPro camera with good resolution and control over image quality to make it suitable for photogrammetry.
To perform accurate 3D measurement, modeling and scanning from images, using the techniques of photogrammetry, the camera should ideally have good image quality, high resolution images, stable optics, a fixed lens, focal length neither too short nor too long, and low lens distortion. The GoPro Hero 3 Black does well on all these criteria except the last two. Note none of these issues are a reflection on the quality of the GoPro camera, but instead a recognition that is was designed for a different purpose.
The unique challenges of using the GoPro Hero 3 for photogrammetric work are:
- Very wide angle lens that causes large lens distortion
- No view finder
- A number of different modes
- Low resolution in some modes
- Designed for outdoor use and no flash so weak low light performance
Modes
The GoPro Hero3 Black has a number of video and still modes. There are two key factors in these various modes that affect the photogrammetric results: resolution, and field of view (FOV). The two recommended picture modes for the GoPro Hero3 Black are:
| Resolution | Image Size | Field of View | 35mm equiv. focal |
| 12 MP | 4000 x 3000 | Wide – 108 deg. | 15mm |
| 7 MP | 3000 x 2250 | Medium – 93 deg. | 20mm |
The video modes may also be used – e.g. for moving subjects or for PhotoModeler Motion. At this time there are no good ways to synchronize multiple GoPro H3 cameras in the video modes, so their use in PhotoModeler Motion is limited. The high speed modes of the GoPro H3 are enticing. For the cost, the high frame rate is impressive, but the low resolution in these modes compared to the picture modes makes certain tasks such as target detection and calibration difficult.
The GoPro can be used with PhotoModeler Motion with lower frame rates (a picture every second or so) depending on how accurate the synchronization needs to be for your project, since the GoPro Hero 3 Remote can fire multiple cameras at once.
Calibration

The GoPro Hero 3 can be challenging to calibrate. With a very wide angle lens you either need a big calibration pattern, or you have to be very close to the pattern. If you get very close to the pattern you run the danger that the calibration will not be ideal for ‘normal’ distances. To reduce blur and keep targets in focus you should use a tripod and good lighting. Due to the wide field of view you may need to modify the tripod rig to get the camera over the calibration grid, otherwise the bottom part of the image will be mostly filled with the tripod legs instead of calibration targets. The camera also has no viewfinder making lining up calibration shots tricky. The smartphone GoPro App for control and viewing makes calibrations easier to do.
Even with all of these adjustments the calibration quality will not be as good as a DSLR so expect slightly larger error values (e.g. It may not be reasonable to expect a maximum residual below 1 pixel).
At the widest settings (largest FOV) you can consider adding the K3 radial lens distortion parameter (an option on PhotoModeler’s calibration) as it can reduce error.
To calibrate the GoPro H3 successfully we recommend using a tripod (modified so the camera is over top of the calibration area), good lighting, the smart phone GoPro App to act as a viewfinder, and the PhotoModeler multi-sheet calibration method to get a large view/target area.
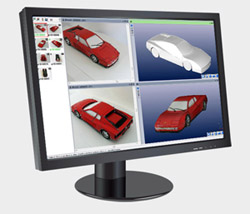
SmartMatch and DSM Projects
PhotoModeler is a versatile photogrammetric software package that includes capabilities such as manual marking, coded target detection, advanced modeling objects, SmartMatch and Dense Surface Modeling. SmartMatch is a method for automatically setting up projects and automatic orientation of the photographs. Dense Surface Modeling (DSM) is a method for extracting high density point clouds and triangulated surfaces automatically from photos.
When using SmartMatch and DSM methods in PhotoModeler with a GoPro H3 it is recommended that photos are taken closer together than normal (that is, more overlap, smaller steps, and smaller angles).
If the object is planar and you take photos that are parallel for the most part to this plane, then relatively normal overlap can be used. If the object has planes that are slanted to the image plane, the surface is curved, or there are objects that stand out from the surface, then with a wide angle lens and small camera distance the images change their appearance quickly using typical larger changes in camera position. This results in images looking quite different which means SmartMatch cannot identify like-features, and DSM cannot get a good surface model extraction. Taking photos closer together, with smaller angles, and with more overlap can improve this with a short focal length, wide angle lens like that found on the GoPro.
UAVs, the GoPro Hero 3 and Photogrammetry
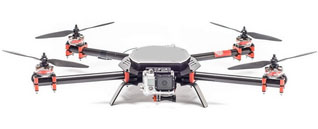 Unmanned Aerial Vehicles (UAVs), or drones, are becoming increasingly popular for taking photographs from above. UAVs are becoming less expensive and easier to fly by the day.
The GoPro camera being small, lightweight and robust seems like an ideal camera to attach to a UAV. The negative is that the camera (even in its medium FOV mode) has quite a wide angle lens, and wide angle lenses are not well suited to aerial photogrammetry. To use the GoPro Hero 3 Black successfully in a UAV / aerial application, you will need to a) fly relatively low, b) try the medium FOV still photo setting, c) take the photos relatively close to each other (small angles and strong overlap), d) use a quad-copter or hexa-copter (instead of a fixed wing) to allow for successful low flight and good overlap, and e) point the camera straight down at the ground.
Generally UAV / GoPro projects are difficult to carry out. We recommend a different camera (dslr or high resolution still camera with more narrow lens) in most cases.
Summary & Recommendations
The GoPro Hero 3 while not designed as a photogrammetric camera can sometimes be used as one with some careful attention. The recommendations are:
- Use the GoPro Hero 3 Black model (or a more recent high resolution version).
- Use the GoPro Hero 3 in one of the two recommended picture modes (see Modes).
- If planning to use the GoPro Hero 3 in a video mode, first consider whether the resolution is sufficient for your task (target marking for example).
- Calibrate the camera with a multi-sheet calibration of suitable size (see Calibration).
- For the widest FOV settings, consider adding the K3 parameter to the calibration.
- When doing SmartMatch or DSM projects take the photos relatively close to each other, especially if the surfaces are not parallel to the image plane.
- Use the PhotoModeler software (version 2013.0.2 or higher).