The Other Photogrammetry Automation – Coded Targets
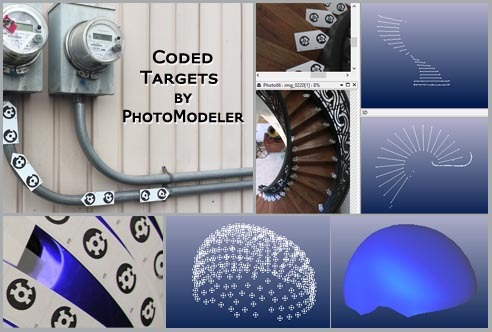
- What are Coded Targets?
- Automation History
- Why Use Coded Targets?
- Coded Targets vs Smart Points
- Coded Target Examples and Applications
What are Coded Targets?
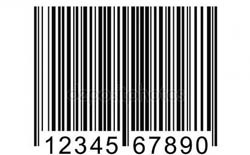
PhotoModeler’s Coded Targets are like bar codes, in that they uniquely identify something (in this case a point on an object or in a scene), but have three differences:
- the code is printed in a circle, making it easier to identify at all angles (including a slant),
- the code is meant to be read at different sizes, different distances, and different angles, and all within a normal photo taken by a normal camera, and
- it has a solid circle in the center to help automatically mark position to high precision.
Coded Targets can help with automating certain point measurement tasks in PhotoModeler. They increase productivity and accuracy.
PhotoModeler’s Coded Targets are called RAD – Ringed Automatically Detected targets. Two of the 999 RAD targets might look like this:

Coded Targets are placed in the scene or on the object before the photos are taken. Coded Targets can be printed on plain paper, be mounted on a rigid board, or be manufactured from plastic for repeated use. The only criteria for size is that the center dot be imaged at least 10 pixels across in all photos. They can be bigger, rotated, or at an angle.
PhotoModeler automatically searches the whole image for what might be a Coded Target and then reads the code to confirm. These Coded Targets can be at an angle to the camera (within reason), and can be different sizes and different rotations. When the same code value is identified in multiple photos, those points are matched or ‘referenced’. Here is an example photograph that has Coded Targets:
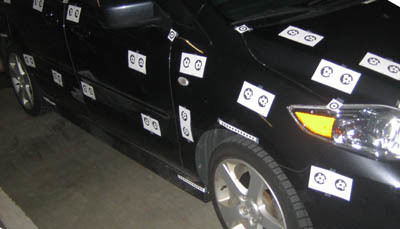
You can see from above it is a naturally lit scene and the targets have been placed on a car. There are many applications of this technology, some of which are described below. A photo such as the one above, would be searched and codes identified in a few seconds by PhotoModeler. A whole project, with 50 photos with coded target points, would be automatically detected and processed (to produce a 3D point set) in less than a minute.
PhotoModeler version 2018.0 (released Dec. 14th, 2017) has a significant improvement to the processing of Coded Target projects. This improvement makes using Coded Targets even more productive.

RAD dot target
In addition to coded targets, PhotoModeler supports RAD dot targets, and plain dot targets. A RAD dot is like a coded target (with a center dot and a ring) but there is no code. RAD dots cannot be identified uniquely (ie. can’t be matched across photos), but PhotoModeler can still mark them automatically. RAD dots are good for adding point density. The ring helps PhotoModeler distinguish this target dot from other circular objects in the images.
Plain dot targets are just high contrast dots with no rings and no code – they do not detect as robustly because most natural photos have circular objects in them. Plain dots are good for working with small points and higher density in images that are not complex. Coded Targets and dot targets can be combined in one project. The Coded Target Tutorial video shows a car roof top box project with a combination of some Coded Targets, dot targets, and the production of a NURBS surface.
Automation History
From the early introduction of photogrammetric measurement during WW2, right to today, one key step in the process has been humans manually identifying points in photographs and matching them to the same points in other photographs. The advent of modern computing meant that starting in the late 1980’s some photogrammetric tasks could be computerized. In the early 2000’s the task of identifying common points in photographs saw some early automation efforts.
PhotoModeler has a long history of point matching automation:
- Coded Targets introduced: Apr 2003
- RAD Coded Targets added: Jan 2009
- SmartPoints introduced: Oct 2010
- Coded Target robust processing improvement: Dec 2017
There are several photogrammetry programs that use smart feature detectors to automate the extraction of point clouds from textured surfaces. Smart feature detection is a recent development in the field, but the earliest automation in photogrammetry was Coded Target detection. Smart feature detection (SmartPoints in PhotoModeler) works off natural surfaces and targets are not needed. Coded Targets have a different goal than SmartPoints as described below.
Why Use Coded Targets?
Coded Target detection, marking, and matching is automatic, fast, and accurate. Below are the main advantages of using Coded Targets compared to both manual marking and automated SmartMatch / SmartPoints:
- speed – much faster than manual marking and referencing, and in some cases faster than SmartPoints as well.
- accuracy – with the center dot target, computer-vision-guided marking can produce point positions precise to less than a pixel. This is far more precise than both manual marking or SmartPoints.
- low point count – often when getting specific measurements, or generating CAD drawings you don’t need a dense point cloud.
- measure the points you want – you can place the target precisely on the point you want to capture.
- measure points that can’t be seen – using the offset ability, a paired Coded Target can identify a 3rd point that might not be visible to the camera.
- model subjects not suited to SmartPoints – shiny, non-textured surfaces do not work well with SmartPoint technology, but Coded Targets can be used.
Are there any disadvantages to using Coded Targets? It is time consuming to place and remove targets. The size of the target is important (modeling large objects requires large targets, which can be difficult to produce). Lastly, if you do need a high density of points, it can be difficult to achieve with the limited number of codes (999 codes with RAD targets).
Further Automation with Coded Targets
In addition to the automatic marking and matching of points with Coded Targets, there are two other useful capabilities in PhotoModeler: offset points for measuring difficult to access or hidden points, and automatic scale and coordinate system setup.
An Offset Coded Target is a pair of targets of fixed and known distance apart. PhotoModeler recognizes these and can compute a third point from this. Offset Coded Targets are great for measuring points where a target cannot be placed (such as in a corner, or on an edge), or even where the desired point is completely hidden from the camera.
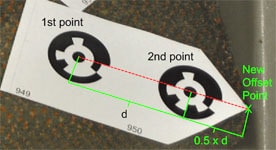
How offset coded targets work
Another unique advantage of using Coded Targets in a project is that they can be used to automatically set a project’s scale, translation, and rotation. For example, if you define the target ids for the ends of a scale bar, you can get PhotoModeler to automatically set up the scale in your projects. See the PhotoModeler Coded Target Scale Setup YouTube video.
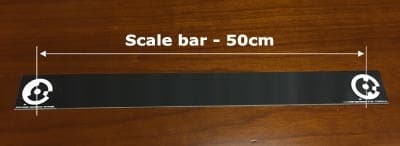
Plastic bar with two coded targets for scale automation
One other interesting capability is that Faro Scene (software for working with Faro laser scanners) can read PhotoModeler Coded Targets as well. They use them to register separate scans, but you might use them to automated the overlaying of laser scan data with a photo within PhotoModeler.
Coded Targets vs Smart Points
PhotoModeler has two forms of point identification, marking and matching automation: Coded Targets and Smart Points. The differences are touched on above, but here are the differences as a direct comparison:
| Coded Targets | Smart Points | |
|---|---|---|
| Point Marking Precision | Fractions of pixel precise | 1 to 3 pixels precise |
| Point Density | Low density | High density |
| Underlying Surface Type | Anything | Must have some texture |
| User Specified Positions | Put points where you want them | Algorithm decides where points are marked |
| Measure Unseen Points with Offsets | Yes – optional | No |
| Automatic Setup of Scale and Coord System | Yes – optional | No |
| Pre-photography requirement | Have to place targets | Usually nothing required |
| Overall Project Accuracy | Can be very high accuracy | Good accuracy |
Coded Target Examples and Applications
PhotoModeler’s Coded Targets are used in several industries for the reasons described above. Some example industries are:
Staircases
Several PhotoModeler customers use Coded Targets to help automate the measurement of staircases, banisters, railings, etc. One such application is the fitting of stair lifts on staircases that don’t have a simple structure. One PhotoModeler customer using Coded Targets for stair lift design is Harmar of Florida – here are two of their projects:

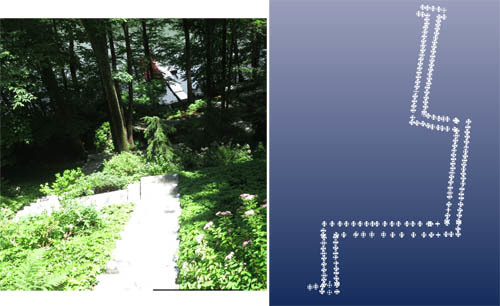
Offset Coded Targets are used to identify the nose of each stair (and sometimes the back as well). Targets are placed on each stair and then a number of photographs are taken walking down the stairs and from multiple angles. A scale between one or more targets is also included. PhotoModeler produces a full 3D model of the points and offsets which can be exported into CAD software for carrying out further design (of lifts for example). Also see the PhotoModeler Staircase Tutorial YouTube video.
Kitchen Counter Tops, Back Splashes, and Other Home Renovation
There are several applications in home construction, or home renovation where one needs to make accurate measurements of a complex shape. A common application is the measurement or templating of kitchen counter tops (and back splashes) after new kitchen cabinets have been placed. Expensive stone counter tops have little room for measurement error. A kitchen company or templating firm might have a set of coded target jigs that sit on typical cabinet bases. Along with offset targets to get into corners, an automated system can be developed to produce accurate measurements and CAD drawings.

One surface that is quite hard to measure with photogrammetry is glass. In the following example, a bathroom shower glass stall is modeled using coded targets and offset targets.

Industrial Parts
There are many industrial measurement applications where very high accuracy is required. Photogrammetry with sub-pixel targets is one of the best ways to obtain that. In addition, industrial parts and equipment often have shiny and metallic surfaces. Both criteria indicate Coded Targets as a good method.
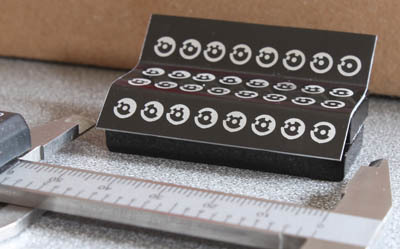
An interesting example is a case where a very small object had to be measured accurately. This industrial measurement system required precise placement and surface modeling of a moving surface that was only 6 cm (2.4″) across. Coded Targets can be made very small. Below is a jig used in this system using laser etched Coded Targets. The jig is only 50 mm wide, making each coded target just 5.5 mm (1/4″) across.
Coded Targets can also be made of retro-reflective material – that is material that bounces light back to the camera with a mounted flash. Many highway signs are made of retro-reflective material. An advantage of making Coded Targets (or plain dot targets) from retro-reflective material is that they are very bright in the photo. Typically, you would set the exposure on the camera so only the targets are visible. Reducing the photos to contain just bright targets points increase the speed of detection – esp. important in some industrial scenes that might have a lot of small circles in the photos.
Other Applications
The applications for Coded Target measurement and modeling are limitless! Other possible applications are; accurate surveying of interiors and small areas, modeling boat hull shape, modeling boat decks for retrofits, accuracy sizing of archaeological specimens, accident reconstruction, tracking motion, and accurate calibration of multi-camera jigs, etc.
Learn more about how Coded Targets work, and take a closer look at PhotoModeler’s Coded Target capability.
