
3D Printing from Photos
In recent years 3D printing technology has become much more accessible in terms of required technical skills and cost. Printing an actual 3D object is now easily achievable if you have a digital model. In this, our 70th tip, we show that with PhotoModeler you can create accurate 3D models from photographs of real objects, to feed into the 3D printing process.
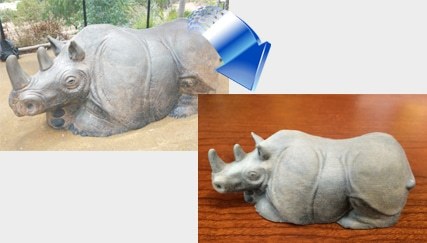
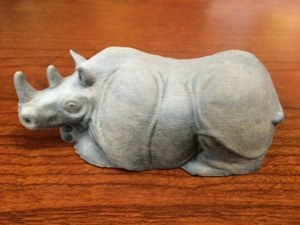
Rhinoceros Sculpture Photos to Miniature Replica

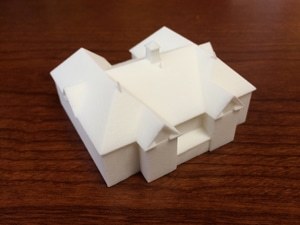
Heritage Schoolhouse Photos to Scaled Model
This article describes the steps for creating accurate 3D printed replicas using photos and photogrammetry.
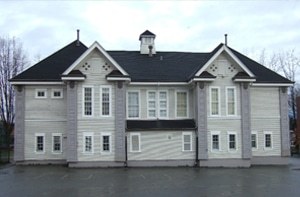
This schoolhouse was modeled using traditional wire-frame modeling tools in PhotoModeler to create points and lines and planar surfaces.
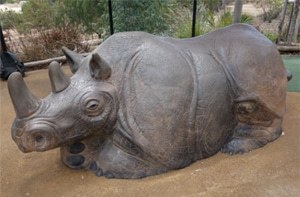
This rhinoceros sculpture was modeled using PhotoModeler Scanner’s SmartMatch and DSM tools.
Our desired output was two scaled replicas – with the schoolhouse at about 1/1000th , and the rhino about 1/10th actual size.
The workflow was as follows:
- Photograph the object.
- Build the model – input and orient the photos, create DSMs, or mark and reference points in PhotoModeler.
- Inspect and clean up the model –minor edits to the point cloud and triangulation.
- Scale the model so the output is suitable for 3D printing.
- Export the model using a format suitable for 3D printing.
- Optionally, repair/close/seal the model to eliminate gaps and anomalies in the triangulation.
- Send the model to the 3D printer or printing service.
This article assumes a basic level of understanding of the PhotoModeler tools used to set up a project, orient the photos, generate and triangulate a Dense Surface Model (DSM), or build up a wire-frame model using points/lines/surfaces, and export the model in a format compatible with the 3D printer/service. At the end of the article is a list of resources that help explain various steps in more detail.
Step 1: Build the Model
Depending on the object or scene, use either PhotoModeler’s manual modeling techniques – point/lines/surfaces (as in the schoolhouse example), or PhotoModeler Scanner (now Premium)’s automated SmartMatch/DSM tools – point clouds and triangulation (as in the rhino example).
Here are the two models in the wire-frame and SmartPoint cloud stages:
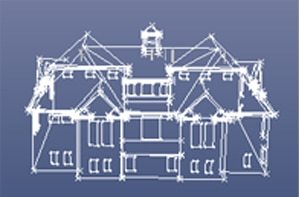
Wire-frame model, points marked and referenced with connected lines
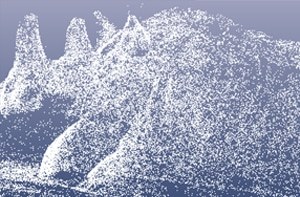
The SmartMatch point cloud
A surfaced wire-frame model generally won’t need any modifications as the surfaces are relatively simple and the triangle count is low. Here’s the schoolhouse in PhotoModeler’s 3D Viewer, showing the shaded surfaces:

Dense Surface Model (DSM) projects may have some noise, rough edges and/or artifacts that aren’t appropriate for 3D printing. This can happen if parts of the image are out of focus, or if they only appear on a small number of photos. In addition, the background or the ground captured in the point cloud will have to be removed.
PhotoModeler’s triangulation process (converting the point cloud into a triangulated surface mesh) will remove most of the noise in the point cloud. Running a preliminary triangulation at this stage will determine if and how much manual cleanup is required.
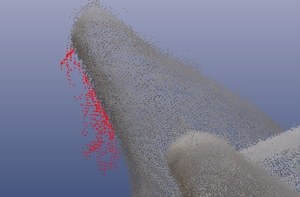
If there is noise in the point cloud requiring manual intervention, use PointMesh Edit mode (see the PointMesh Edit tutorial and the PointMesh modify tutorial) with Region Select mode to select and delete unwanted cloud points. Some noise generated by the MVS tool was cleaned up on the rear portion of the rhino:
When satisfied with the general model shape, detail, and overall quality, use the Modify PointMesh tool to triangulate the dense MVS point cloud. In most cases, the default triangulation settings will produce a decent meshed model. However, there are settings to help fine-tune your result. For example, for increased triangulation detail, you may want to increase the “Meshing smoothness/sharpness” setting from 4 to 5 or 6 (some experimentation may be required).
This shows a couple of the common settings used to modify and triangulate the MVS point mesh:

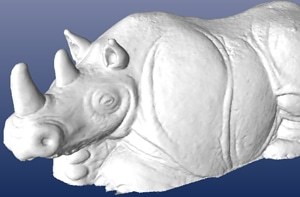
Here’s the rhino DSM after triangulation:
While we want the surface detail to come through, we also want to keep the triangle count low for 3D printing, since the printer may not be able to match the high level of detail that PhotoModeler can produce.
Wire-frame surfaced models (eg. the schoolhouse) are comprised of a relatively small number of triangles, so decimation or other triangulation tools won’t be needed.
Step 2: Inspect and Clean Up the Model
Inspect your model for irregularities and anomalies and assess surface triangle count. For 3D printing, you will want to keep the size of the desired output relatively small. A 3D printer has limits to the physical size it can print, and the cost to print is usually based on volume, so as the size increases, the costs escalate very quickly! You will not want to create a model with an unnecessarily large number of mesh triangles, especially if it’s going to be scaled down to a much smaller size. See step 3 below.
The rhino DSM project that we printed had approximately 100,000 triangles after decimation. This provides good detail and keeps file sizes manageable. Use the PointMesh Table to assess your triangulated point meshes and if your point mesh is overly dense, you can use triangulation decimation to lower the triangle count. Select the PointMesh in a PointMesh Table or the 3D Viewer, click the Modify PointMesh tool, click Uncheck All, then choose and expand just the ‘Decimate triangles’ setting increasing the decimation percentage value so that your triangle count is close to your desired number. A new PointMesh with a lower triangle count will be generated.
If you see any anomalies with the triangulation, you can use PointMesh Edit mode with Region Select to select and trim or delete unwanted portions or rough edges of the mesh.
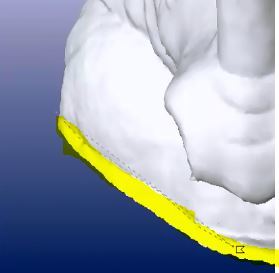
Some triangle cleanup around the edge of the base may also be required, as a clean edge of an open-bottomed mesh is important for good 3D printing.
Step 3: Scale the Model
Scaling the model is important when 3D printing as the cost of the print is usually based on volume. Also, there are physical limits to the size of a model that 3D printers can accommodate. This tutorial video gives an overview of how to set up a coordinate system in PhotoModeler (including scaling). Note that typically we use scaling to make the model from PhotoModeler match reality, but in this case, we want to scale the objects down so they are more appropriate for the 3D printing process.
Step 4: Export the Model
When submitting a model to a 3D printer/service, it will need to be in a compatible format. PhotoModeler supports numerous export formats to ensure compatibility with other 3D modeling tools and viewers. Some of the more typical formats include .stl, .obj, .vrml, etc., and what you choose will depend on the type of model to be printed. In some cases the model can be realistically photo textured or colored by the printer, so you’ll need to use a format that supports photo textures, such as the .obj format.
We wanted a photo textured output for the rhino so we used the .obj format; we wanted a non-textured output for the schoolhouse so we used the .stl format.
Step 5: Scan and Repair the Exported Model (optional)
Check with the printing service provider about the suitability of the model for 3D printing (there is often an evaluation process for this purpose to help minimize printing fails). In some cases when submitting a model to a 3D printer/service, it may need to be ‘watertight’ and/or optimized with no gaps or holes or unusual complexity in the triangulation of the model.
The 3D printing service we chose (Shapeways, more on this in the next section) has a built-in repair service that scans and repairs your model right after upload. If you’re using your own printer or some other service, there are tools available online for scan and repair.
These repair tools automatically review your model and perform various repair functions such as stitching, closing gaps, and holes, triangle correction etc. You may save some time and avoid having to re-submit your model by running your model through a repair tool before submitting it for printing.
This shows the exported models after cleanup in their final state before being submitted for printing (although it’s not visible, the bottoms of the models have been sealed – this isn’t always necessary if your service will repair):
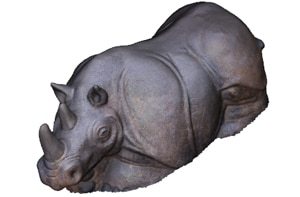
Rhino .obj format – photo textured
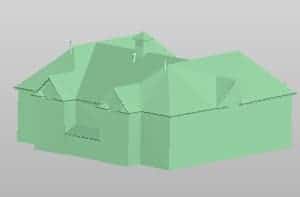
Schoolhouse .stl format – non-textured
Step 6: Submit the Model for Printing
More and more 3D printing services are available these days. Here is a list of some: all3dp.com/2/best-shapeways-alternatives/
These operations provide full-service 3D printing, with optional consulting, a wide variety of options for printing materials, and facilities to accommodate big and small prints.
There are also small 3D printer services cropping up, where individuals or businesses with 3D printers join a “Hub.” This allows you to choose from numerous printer services, often located very close by for a quick turnaround. The sophistication of these services varies from a simple home office setup with limited materials to larger full-service operations.
Once we submitted our model to Shapeways, it took about a week for them to receive, review, produce and ship the two models. The process was fully automated.
Step 7: Receive the 3D Object
A little over a week after placing the order with Shapeways, the 3D prints of our two objects arrived at our office.
We had gone full circle – from a real object to photos, through PhotoModeler, to an exported digital 3D model, to a 3D printer, and lastly back to a scaled 3D object!
Watch the YouTube video for an overview:
Rhino model in Sketchfab:
Rhino Model for 3D Printing
by PhotoModeler
on Sketchfab
Other Resources
Here are some links with more information on project setup, subject matter suitability, and general information on the tools required to carry out the above process.