
Tip 75: Masking to Improve Orthophoto and 3D Textures
Did you know that photos can be masked to improve orthophoto and 3D texture output? 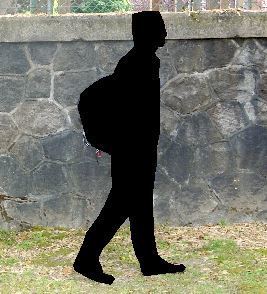
Sometimes project photos have unwanted items or artifacts that can negatively affect the orthophoto or 3D texture output. For example, a moving car or person appears in a scene while photos are being taken, or a tree or bush is visible in some photos and obscures a portion of the model object or scene.
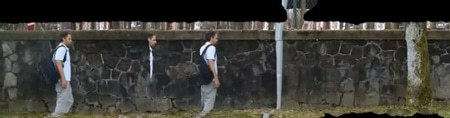
In the associated tip video (linked below), a person strolled through the scene while the photos were being taken in front of the rock wall which was being modeled. Also, a large tree trunk and sign post blocked portions of the wall. The goal was an orthophoto and 3d textured model that did not show the person, tree or post.

Here’s an example showing an orthophoto export without using masks (and no blending):
And here’s the orthophoto export after masking out the person, tree trunk and the sign post (with blending enabled):
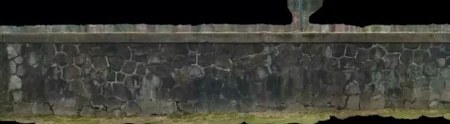
The orthophoto output shows no undesirable objects. PhotoModeler replaces the pixels in the masked regions with pixel data from other photos. To be sure that no trace of the obscuring object appears in the output, the mask should be applied to all photos containing the unwanted object. This ensures that PhotoModeler will only use the photo region without the obscuring object when generating the photo texture.
The Draw Mask tool has several useful components. While in Draw Mask mode, right click to reveal a menu:
- Toggle between ‘add’ and ‘subtract’ mode to add or cut away from an existing mask, which is useful when fine tuning the detail of a mask.
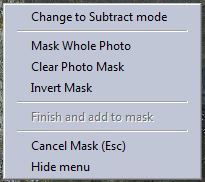
- Mask Whole Photo – useful when it is easier to cut away than to outline a mask region
- Clear Photo Mask – removes all masks on the photo
- Invert Mask – flips the mask so that unmasked regions are masked, and vice versa
- Finish – finishes the mask and writes the file
- Cancel – cancel the mask drawing
- Hide menu – continue the mask drawing
The Draw Mask mode creates a mask image file on disc – written to a sub-folder of the project’s folder. A mask image is an overlay where the region to be masked is black, and the transparent region is white. Masks can also be created or edited in other applications. The “Texture mask image file name” setting on the Photo Properties pane is used to associate a mask image with the photo.
Mask display is controlled on the “Visibility on Photos” pane. Once a project contains a mask, the check box to toggle its visibility is shown. Mask transparency can also be set using the Transparency slider:

Watch the Youtube video for an overview of using masks PhotoModeler: