
Tip 46: Fine adjustment of photo-marks with keys in PhotoModeler
A short and sweet tip this week. Manually marked points on photos can be moved by selecting them with the mouse and dragging them. They can also be fine adjusted using the keyboard’s arrow keys.
Marks on photos in PhotoModeler (such as point marks, line end marks, cylinder marks, surface draw marks, etc.) are used to compute the 3D position of the underlying 3D object. When these marks have been manually placed, you sometimes want to move them to a location that better matches the underlying photographic data.
Photo-marks can be selected (move the mouse to place the cursor over the mark, and press the left mouse button), and dragged (keep the mouse button down and move the mouse so the cursor is in new location on the photo, and release mouse button). This is a fast and efficient way to move marks.
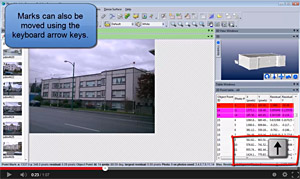
Sometimes you want finer control over the movement – perhaps wanting to move just a few pixels, or even a fraction of a pixel. Once a photo-mark is selected (it highlights in red on the photo), you can move it up, down, left or right by one screen pixel by pressing on the arrow keys on the keyboard. The zoom level of the photo on the screen controls how much this movement is relative to the underlying photo. If the zoom is 100% then one screen pixel movement is one photo pixel movement. At high zooms, you can move the photo-mark by sub-pixel amounts in the original photo space.
Watch the Youtube video to find out how.