
Tip 36: PhotoModeler’s Automatic Camera Library Matching
PhotoModeler’s automatic camera matching is great for reducing errors and improving project start-up time when you work with more than one camera in your photogrammetry project. This tip video shows the various ways that camera matching works (with one or more cameras in a single project).
Automated camera matching is done on photographs from most modern digital cameras. These cameras store information in a special part of the image file called the EXIF header. The EXIF header stores information such as the model and make of the camera that took the photo. E.g. ‘make=Nikon’, ‘model=D7000’.
In addition, most cameras store information such as focal length, f-stop, date, etc. in the EXIF header. There are a number of EXIF viewer programs for seeing this data in the images from your digital camera.
PhotoModeler uses this EXIF data in a few ways. First, during the camera calibration step, all images used in the calibration are checked to ensure they have the same EXIF data. Second, after calibration, PhotoModeler stores this EXIF data with the solved camera parameters in the PhotoModeler Camera Library. The Camera Library can store any number of cameras.
Third, when photos are imported into a new PhotoModeler project, PhotoModeler will check to see if they have EXIF data. If they do, that EXIF data is compared with any cameras in the Camera Library. If a match is found (based on make, model and focal length) then the camera from the library is automatically assigned to the photos in the project.
 You can import photographs taken with different cameras into one PhotoModeler project, and if they have different EXIF data, and match different cameras in the library, all the cameras will be automatically assigned to the correct photos.
PhotoModeler needs to know the correct and matching camera parameters for each photo, so that the highest accuracy solution can be achieved.
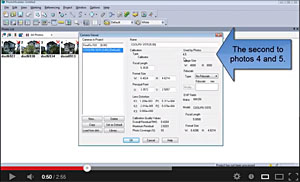
When you have multiple cameras of the same make, model and focal length (for example you have set up four identical Nikon cameras to capture an area) PhotoModeler cannot disambiguate during matching. There are two options: a) a dialog comes up allowing you to pick the correct calibration from the Camera Library, or b) image file name tags can be used.
An image file name tag is a unique set of prefix characters in the name of the image file that identifies which camera took the photo. Some cameras will allow you to set the image file name prefix, or files can be renamed in other ways. For example a two camera project could have a set of photos with names like: ‘Cam1_001.jpg’, ‘Cam1_002.jpg’, ‘Cam2_001.jpg’, and ‘Cam2_002.jpg’.
File name tags can also be used for automatic camera library matching when there is no EXIF data (e.g. stills taken from a video camera).
Watch the video to see how photo-to-camera matching, via EXIF, manual, or name tags, is done with one or more cameras. Video can be seen larger and HD on Youtube.