
Tip 45: Projecting an external 3d model onto a photo
 There are a number of applications where you want to overlay an existing 3D model onto a photograph. The technical term is ‘3D Projection’. Projection allows you to see the 3D model overlaid on the photograph in the correct orientation and taking into account perspective. This tip video demonstrates the projection technique using photogrammetry in PhotoModeler.
For the projection to look correct, the photograph has to be oriented relative to the 3D model. This can be carried out in a number of ways. This video shows a completed PhotoModeler project that through the use of scale and rotate is put into the same coordinate system as the external CAD file. Another approach is to use the 3D model data as control points, which are marked on the photo to orient it.
When the project (one or more photos and their camera orientations) and the external 3D model are in the same coordinate system and then combined via import, you can ask PhotoModeler to show the 3D model overlaid on the photo.
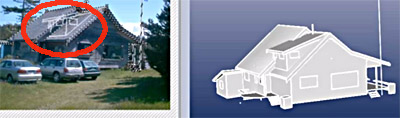
In this example we show a cabin that will undergo a renovation to add a new dormer on the roof. The CAD model of the dormer was imported into a solved PhotoModeler project using photographs taken before the renovation. This visualization is useful for the clients to understand how the renovation will look when complete.
The CAD model used has uncolored and untextured surfaces, but they could have been to increase the realism of the visualization. As well the video also shows the renovation complete.