Tip 84: Preconfigured Layers and Materials in New Projects
Do you find yourself adding the same layers and/or materials to each of your new PhotoModeler projects? 
Layers and Materials can be manually added to a project easily, but pre-configured layers and materials can be added to all new projects, automatically!
First, some background on layers and materials:
- Layers: Much like ‘layers’ in other CAD and graphics software packages, PhotoModeler Layers provide a means to separate or group model objects. Layers are used to control visibility of items in photos and the 3D Viewer, and can be used in Export. All projects by default have a ‘Default’ layer. Layers can be manually added to a project using the Layers dialog box, accessed by clicking the Layer tool:

- Materials: A ‘material’ defines what a model item will look like in the 3D Viewer or when exported. A material can be used to color or shade an item or give it a photo texture. All projects by default have a “Surface Default” material for surfaces and meshes, and a “White” material for other items. Materials can be manually added to a project using the Materials dialog box, accessed by clicking the Materials tool:

A set of pre-configured layers and materials can be added to each new project, by defining ‘profiles’ in the PhotoModeler configuration file. The process is fully explained in the Help document (press F1 in PhotoModeler, or use the Help menu, and search for “Material and Layer Profiles”). The Help section also describes how to open and edit the “PhotoModeler.ini” configuration file and add the settings to it, showing an example set of profiles.
The PhotoModeler.ini file is located in a subfolder of the AppData folder, similar to this (replace ‘name’ with your Windows account name):
Material and Layer profiles can be added to the bottom of the file. Sample profiles look like this:
[MaterialsProfile]
NumMaterials=2
Material1=Blue
Material1Type=1
Material1TypeParam=000000255
Material2=SinglePhotoTexture1
Material2Type=2
Material2TypeParam=1

[LayersProfile]
NumLayers=2
Layer1=Hidden
Layer2=FrontSection
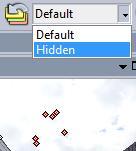
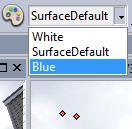
Once the project has the required layers and materials, it is simply a matter of selecting the item(s), and assigning the them to the layer or material, using the Layer and Material drop down tools next to their control buttons. 
The visibility of the assigned layer can be set using the Layer visibility controls. The example below shows the Layers control on the Visibility on Photos pane – items assigned to the ‘Hidden’ layer will not be displayed on photos, i.e. their 2D ‘mark’ locations, nor their 3D ‘projections’. 
To assign the ‘Blue’ material to an item(s), select the item(s) in a photo, 3D Viewer or table, then select the ‘Blue’ material on the 
Note that once the layer or material has been assigned to an item, the drop down tools will show the item’s layer and material when the item is selected.
Using layers and materials can help organize a PhotoModeler project, especially when it starts getting complex, and is a useful method to visually differentiate items in photos, the 3D Viewer, and with Export.
Also see this related tip.
Watch the YouTube video for an overview on the use of pre-configured material and layer profiles:

