
- /
- /
- /
- /
How to Get Started Evaluating Coded-Target-Based Measurement
Scenario
- You have a measurement task where the accuracy and speed of Coded Targets might help.
- You are new to this task or are evaluating PhotoModeler for the first time.
How do you get started?
You are new to PhotoModeler or Coded Target projects and want an easy way to test and evaluate. Coded Targets help PhotoModeler solve projects with less work and greater accuracy. Coded Targets are helpful too for setting up measurement planes and performing other types of accurate measurements. They are often used in fabrication and industrial measurement tasks like marine decks, canvas, dashboards, kitchens, glazing, swimming pool decks, interior siding, industrial structures, etc. Here we describe a quick way to get started and get early success.
- Note if you are measuring boat decks, we suggest viewing the Learning Boat Deck Measurement pages.
- Note if your interest is measuring 2D patterns and template shapes, we suggest viewing the 2D Template Capture pages.
You may see references to Letter Sheets on our site and application descriptions. These are sheets of Coded Targets arranged in a specified way that assists with other PhotoModeler tasks. You can read more on how Coded Targets and Letter Sheets differ.
Getting Started Steps
- Find a small area that is like the projects you expect.
- Print out some Coded Targets of the correct size. Size them so you can cover your area with 10 to 20 targets. You can pick your size in the PhotoModeler Coded Target print dialog.
- Optionally cut the individual targets out of the paper, so you get a better spread, and sheets won’t cover important features. When cutting, leave enough white space around the target and leave the number.
- Place or tape the targets to your area – a good spread, not in a line, and don’t cover important features you may want to measure. See the image below.
- Take at least one scale measurement between two targets (or multiple scales between pairs of targets) and note the Ids and the distances.
- Take approximately ten photos at different angles from around the area. See the image samples below.
- Start a new Automated Coded Target project in PhotoModeler, and load photos. Choose automatic camera calibration. See the Coded Target Tutorial.
- Review the solution to see if errors are low and if cameras look correctly positioned in the 3D Viewer.
- Add scale to the project.
- Determine what you want to measure. If the features are on a plane or a surface, you can fit a plane or surface to the Coded Target 3D points and perform Surface Draw. The Coded Target tutorial uses the offset points method of getting 3D points, and the Surface Draw Overview video shows obtaining points from a plane.
There are several ways to proceed, and other articles and videos get into the details. The goal is to get you started and to have a successful PhotoModeler project with minimal work. Review the links included in the article above for further guidance.
Sample Coded Target Layouts
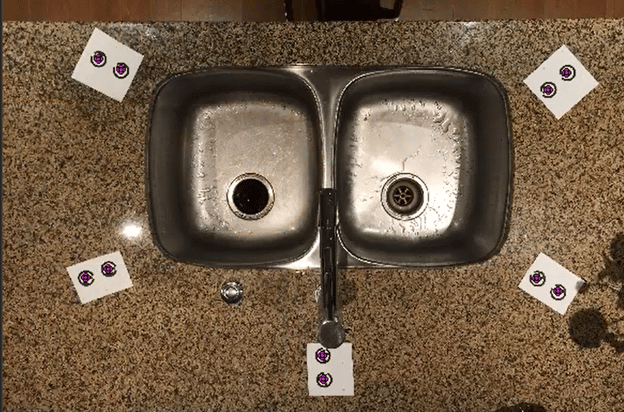
Countertop and kitchen sink example
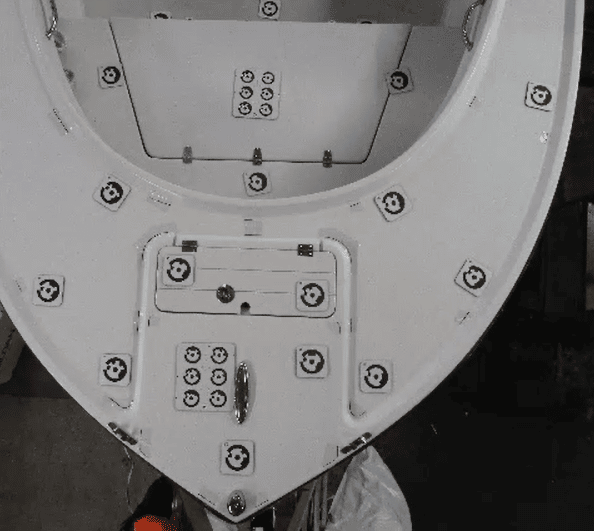
Boat deck example