Marine Fabrication Tutorials and Videos

Tutorials and videos for those doing marine fabrication such as boat deck replacement or canvas 3D templating.


Decks: Introduction

Introducing and getting started using PhotoModeler for boat deck measurement. [for a UI change see 'Surface Selection Menu' video]

Getting Started with Boat Deck Measurement

1. For those first learning to use PhotoModeler to measure boat deck panels. It takes you through a project that you can do at your office or home - so you can first learn the basics.

Boat Deck Measurement - On-boat Work

2. For those taking photographs and laying targets on a boat in preparation for PhotoModeler project work.


Back to top


Decks: Working in PhotoModeler

The steps used to do deck modeling from on boat work to working with PhotoModeler. [for a UI change see 'Surface Selection Menu' video]

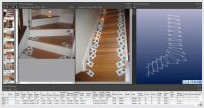
Boat Deck Measurement - PhotoModeler Work

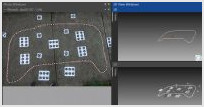
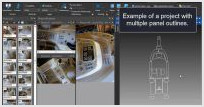
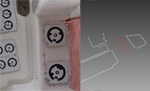
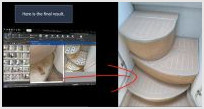
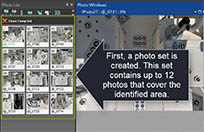
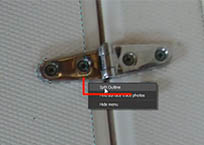
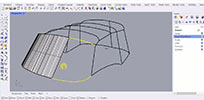
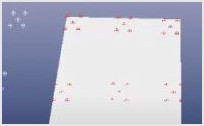
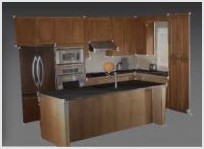
3. For those that will use the PhotoModeler software to convert the photographs into tracings that get exported to CAD. See also Outlines.

Boat Deck Measurement - Continuing Work

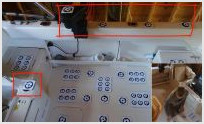
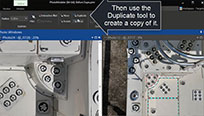
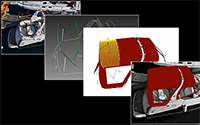
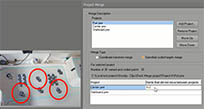
4. Continue to learn how to use PhotoModeler for adding new panels, verifying measurements, using tools such as image enhance, and how to flatten from a 3D model for a 2D CAD export.

Surface Draw - fixing a wrong surface

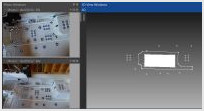
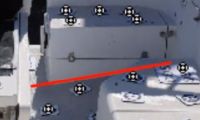
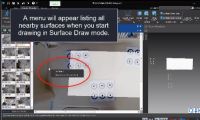
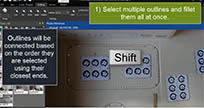
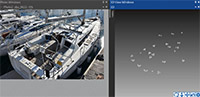
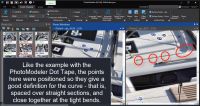
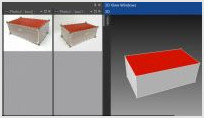
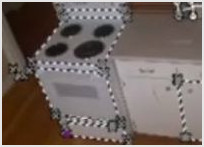
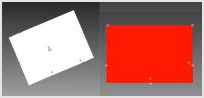
This video shows what happens when Surface Draw is place on the wrong surface (here outlining areas of boat decking), and how to fix it by assigning the correct surface. Surface Draw points, lines, or curves, assigned to a surface in PhotoModeler that does not match the true real-world surface will not calculate in the correct 3D position. This means, when they are viewed from on photos from other angles, their positions will not line-up and match. To fix this, the correct surface is assigned to the points and the correct 3D position are automatically calculated.

Back to top


Default Plane Offset

When doing Surface Draw on a plane that does not match the true surface, due to targets with thickness, this video helps with setting up a default thickness/offset for the target planes.

Working with Small Deck Panels

Explains a few methods for dealing with small deck panels that are smaller than can hold three normal targets. Also how to manually fix a panel without enough targets.

Sloped Deck Panels

How to handle panels on a boat deck that are sloped relative to the main plane, and you are using the Surface Draw tracing method.

Back to top


Merging Marine Deck Projects in CAD

For larger boat deck projects you may need to split into two or more projects. This video describes how to merge this in CAD.

Coded Target Presets

Using coded target preset configurations to automatically set up a project's coordinate system, planes, offsets etc.

Surface Selection Menu

Starting in version 2021.1 there is a new method to help pick the surface you are doing surface draw on - using a pop up menu of close by surfaces.

Back to top


Some of my Decking Photos did not Orient

If you encounter a decking project where some of your photos did not orient (have a Red X on the image chip), this video will assist.

Improving Visibility of Marks and Projections on Photos

When the Mark or 3D Projection of the model is the same color as the photo background it can be hard to see. This video describes a few settings that can be used to improve this.

Modeling Boat Decks without Letter Sheets

An overview of how to extract 2D tracings of flat decking panels using non-Letter Sheet targets.

Back to top


Decks: Outlining

The Outline tools used in decking, templates, etc.

Outlines

An overview of the Outline surface drawing methods and tools. CAD-like drawing capabilities for high quality tracings. See also Boat Deck Tracing.

Outlines Manipulation

Four tools to manipulate whole Outlines: Duplicate, Mirror, Move and Rotate.

Find Surface Trace Photos

Help answer, "What photo do I continue my tracing on?" when working with Outlines and Surface Draw in a multi-photo project.

Back to top


Outlines - additional features

Three additional features for Outlines (multiple fillet, set radius, corner to fillet).

Outline Split

Split an Outline Line or Spline into two so other elements can be added, or assigned to different surfaces.


Back to top


Canvas: Introduction and in PhotoModeler

Videos for marine canvas measurement and 3D templating.

Digital Templating for Marine Canvas with Your Camera

An introduction to how PhotoModeler and a camera can be used to measure and do 3D templating for marine canvas work.

Getting Started with Marine Canvas

The first steps in any marine canvas project are described

Measuring Points, Lines, and Curves for Marine Canvas

This video builds on the Getting Started canvas video and describes how to add points and other objects needed to complete a canvas measurement ready for CAD export.

Back to top


Introducing Bent Tubes

Bent Tubes are used to model cylinderical tubes that have bends in them - such as those that hold up marine canvas. This video introduces them and shows how to create.

Marine Canvas in Rhino CAD

Demonstrates techniques for handling canvas measurement data (points, lines and bent tubes) in Rhino CAD to produce canvas panels.


Back to top


Tip Videos

Various interesting short videos that may help with marine projects.

Manual Points Project

For manual marked projects (or when you need to add manual marks and references to an automated project). Covers completing a simple manual points-based project start to finish.

Troubleshooting high residuals

High mark residuals are often caused by incorrect references. This video describes a way to find incorrect references in a manually marked PhotoModeler project.

Creating Plane Surfaces

PhotoModeler can create a planar surface along any axis pair or fit to a set of selected points. The size and offset of the plane can be modified using it's properties.

Back to top


Surface Draw Overview

A deep dive into all things Surface Draw. Where and how Surface Draw is used.

Default Plane Offset

When doing Surface Draw on a plane that does not match the true surface, due to targets with thickness, this video helps with setting up a default thickness/offset for the target planes.

Referencing

Demonstrates Referencing (manually matching points and objects that are marked on different photos) with more detail than the Manual Points Project.

Back to top


Expand selection to all windows

Use the expand selection to all windows command ('w' short-cut key) to select all marks and objects associated with the current selection in all open views (photos, tables and/or 3D view).

Ways to Open Photos Showing a point

PhotoModeler has several tools to identify photos related to a point. This video describes their use and different ways to help identify which photos are useful when creating 3D points.

Automated Coded Targets

How to run an automatic project with RAD coded targets and offset points. Automatic marking and automatic referencing described as well.

Back to top


Fitted Plane Rotation and Size

A Plane Surface fitted to 3D points is a powerful capability in PhotoModeler. This video demonstrates this plane type, and how one can control the plane's 3D rotation and its trim size.

Dimensions

How to create annotation text and dimension lines on photographs.

Merging Two or More Coded Target Projects

Describes how to reuse Coded Targets in multiple projects and merge the projects based on some subset of shared targets. Music by Bensound.com.

Back to top