
- /
- /
- /
PhotoModeler 2019 – User Interface Revamp – Key Concepts
The PhotoModeler 2019 version introduced a new user interface. We hope the transition to the new user interface is smooth and intuitive for all PhotoModeler users. Here’s a quick overview of the key concepts. As well you may be interested in the PhotoModeler 2019 User Interface Overview video.
The key concepts described below are:
- Ribbon Toolbar
- Quick Access Toolbar
- Workspaces
- Themes
- Tool search
Ribbon Toolbar
While previous versions of PhotoModeler used a traditional menu and toolbars, PhotoModeler 2019 uses the more modern and cleaner Ribbon Toolbar system. The Ribbon combines the menu and toolbars into a set of tools separated into Tabs.
Tabs
Tools are grouped into a new set of ‘tabs’, and within each tab, tools are further divided into ‘groups’ of related tools:
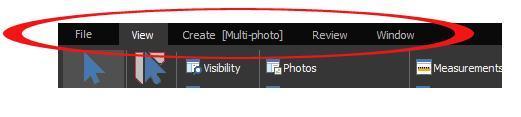
File Tab
The left-most File Tab on the ribbon reveals a ‘Backstage’ menu showing a list of application and project wide tools, such as New, Save, Open, Preferences, Help etc.
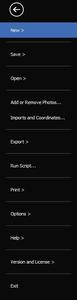
Items on this tool list that end with a ‘>’ will reveal a pane of tools in the backstage area to the right. Items without a ‘>’, bring up tools or dialogs to perform project wide or application actions.
These items should be quite intuitive, e.g. click ‘New >’ to start a new project, ‘Save >’ to save or backup projects, ‘Open >’ to open a project, etc.
Click the Back Arrow in the round circle at top left to return to the main application.
View Tab

The View tab contains typical tools related to project viewing, such as the Select tools, the Pane tools (e.g. Visibility, Measurements etc), Tables, 3D Viewer etc.
Create Tab

The Create tab has tools related to project actions like Processing, point marking and referencing, surface defining, setting up a coordinate system etc.
An additional related project action tab appears to the right for certain work-spaces/types of projects containing project type specific project tools; e.g. in a DSM project, the DSM specific tools are on the Cloud/Mesh Tools Tab. The Create Tab (and its related tab) varies based on the loaded workspace (see Workspaces section below) and will display tools that are typically used in that project type.
Review Tab

The Review tab has tools related to project review and reporting, like Point Review mode, Status Report, PDF Report, Cameras etc. This tab is common to all Workspaces.
Active Window Tab

The Active Window tab (which is ‘contextual’, appearing only when photo, table or 3D Viewer panes are active) has tools related to the active panes and interaction, like tiling, maximizing, zooming and other view interaction.
Quick Access Toolbar
The Quick Access Toolbar appears at the top of the application is the caption bar and contains some of the most common tools:

These common tools are always visible so that you can quickly Save a project, Open a project, Select, Undo, Open a 3D Viewer, or access the Help. The toolbar is customizable, so if you need tools that you always use, click the down arrow at right to bring up the Customize dialog.
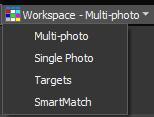
Workspaces
To help simplify the user interface, tools are categorized into ‘workspaces’. This helps limit the tools most commonly used for certain projects, and hide others. This makes tools easier to find. When a project is loaded or started, the appropriate workspace is loaded based on the project type. However, if there are tools missing for the project your working on (we hope this is a rare occurrence!), you can switch workspaces using the selector at top right of the ribbon toolbar (the current workspace is shown in the selector):
Themes
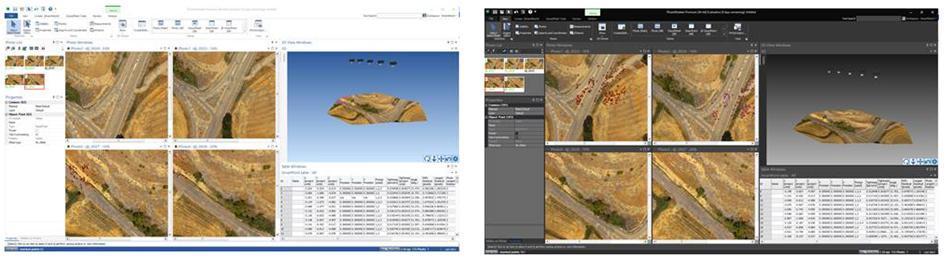
When PhotoModeler 2019 is first installed, the Dark Theme is set. The Dark Theme has black and gray backgrounds. A setting on the Preferences dialog controls whether it’s a Light, Dark, or Colorful Theme (blue). The light and dark themes are shown here:
Tool Search
If a tool cannot be easily found, the new ‘tool search’ box towards the right edge of the ribbon toolbar can be used to find it:
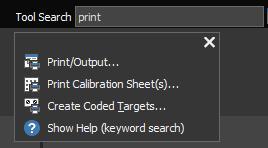
Simply start typing some keywords (tool name, function, intent) and a list of relevant tools will appear. You can then click/use the tool shown in the menu.