
Surveillance Cam, Dash Cam, Body Cam Measurement with PhotoModeler
Often we hear of a crime being committed in view of a surveillance or security camera, or a suspect from a crime walking past a surveillance camera before or after the incident. The video and stills from these cameras are important pieces of evidence.
In addition, we have many dash cams and body cams in use that can capture key evidence. We can determine the positions, speeds, heights, etc of key objects in a frame from one of these cameras that can be key to a case.
PhotoModeler is a tool that performs measurements from images and can be very helpful in obtaining accurate data from these sources. Often 3D laser scan / LIDAR data is combined into the PhotoModeler project for improved accuracy and visualization.
These videos may be of interest:
- Extract Measurements from a Security Image – tutorial video
- Establishing Video Speed from Surveillance Video – 3rd party YouTube video
- Using LIDAR and Cloud Pinning to Solve Vehicle Speed from Dashcam video – YouTube video
- Determining a suspect’s height from an unknown surveillance camera – YouTube video
- Use LIDAR to Help Solve a Single Photo Forensics Case – tutorial video
- Using Video from Stationary Cameras in PhotoModeler – tutorial video
For additional technical details you may be interested in: Solving Single Photo Geometry with External Data.
Other Examples
Homicide Suspect Height Measurement
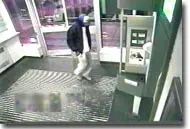
A homicide suspect entered a bank shortly after the incident. A key piece of evidence was the suspect’s height. The video camera filming the lobby of the bank captured the suspect and his height needed to be verified from that footage.

Still frames from the bank camera were combined with a 3D survey in PhotoModeler to calculate the suspect’s height. Verification was also carried out with the same camera, same technique, and volunteers of known height. The technique was proven to be accurate and was used to aid in the criminal prosecution of the suspect.
Crime Scene Diagram from Surveillance Still

Here we show the diagramming of a crime scene where the only remaining evidence is a single photograph or video frame. Using PhotoModeler, and its various tools designed for this sort of project, important measurements can be extracted long after the scene is gone.

In this simulated crime scene project, a single image from a surveillance camera was used. The parameters of this camera are not known so we used the Inverse Camera process in PhotoModeler. Using assumptions of parallel and perpendicular lines we set up Constraints applied to the marked lines (as shown in the first image). When the project was solved, the camera parameters (such as its position, its angles, and its focal length ) were solved along with the positions of the lines in 3D space. Additional detail was then added to the model using Surfaces and Surface Draw. After adding scale to the model, it was ready for measurement and for export to a diagramming package such as Crimezone for further enhancement. While this project was based on an unknown camera and a scene from the past, this method can also be used as a quick way for a forensic technician or officer to diagram a scene where they were present to take the photograph with their own camera.
Abduction Suspect Measurement
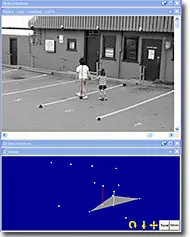
In this simulated scene a female, holding a child’s arm during an abduction, passes by a surveillance camera.
A survey was done of the parking lot to generate a set of 3D control points (this survey was done as a standard PhotoModeler project with a calibrated digital still camera). The data generated from the survey was used as control points in a single photo project based on the still shot from the surveillance camera.
The height of the suspect and child (for verification) were measured using a single photo technique based on verticals from the plane of the parking lot.